前言
- 检查宿主机是否支持
perf指令,如果不能,则有关调试加速rr-debug的部分无法使用。安装教程参考CSDN。
- 如果是Docker容器启动,在启动镜像前最好设置
--cap-add SYS_ADMIN,从而可以正常使用rr-debug。不建议使用较老的系统,还要自行折腾gcc的升级。另外SYS_ADMIN可能不符合最小权限原则,自行考量。
- 如果是虚拟机,可尝试在虚拟机内部安装并使用perf工具。检查是否正常工作,运行
perf --help是否正常显示所有帮助信息。
- 检查环境中
gcc的版本,运行gcc -version返回的版本号需要>=10。如果是clang则需要>=11。
- 全程最好有github访问支持,以防止网络问题导致编译失败。
本教程以VTR其中一个子模块VPR为目标。记录VPR二次开发的环境搭建过程。
准备工作
docker启动
如果是虚拟机可以跳过这个小章节。
我们以ubuntu:22.04基础镜像为例:
--cap-add SYS_ADMIN允许docker容器使用perf指令,这对于之后rr-debug安装重要。
- 再次提醒:检查宿主机是否支持使用perf指令,否则docker内部仍然无法使用。之后rr-debug也无法使用,这条指令毫无意义。
1
2
| docker run --cap-add SYS_ADMIN -itd -p 8022:22 --name="VPR" ubuntu:22.04 /bin/bash
docker exec -it VPR /bin/bash
|
环境安装
需要安装基础编译环境:
1
2
3
4
5
6
7
8
9
10
11
| apt update
apt install -y cmake
apt install -y bison flex zlib1g zlib1g-dev tcl8.6-dev libreadline-dev libffi-dev libtbb-dev pkg-config
apt install -y ccache git wget curl
apt install -y gcc-11 g++-11
apt-get install linux-tools-common linux-tools-$(uname -r)
|
拉取并编译项目代码
作者演示的代码仅包含VTR模块中的VPR软件子集。
1
2
3
4
| git clone https://github.com/verilog-to-routing/vtr-verilog-to-routing.git
cd VLSI-FPGA
mkdir build
sh make.sh
|
编译期间需要访问github获得资源,需要保证网络通畅。
如果看到以下运行结果说明编译成功:
1
2
3
4
5
6
7
8
9
10
11
12
13
14
| [ 98%] Building CXX object vpr/CMakeFiles/libvpr.dir/src/timing/read_sdc.cpp.o
[100%] Building CXX object vpr/CMakeFiles/libvpr.dir/src/timing/slack_evaluation.cpp.o
[100%] Building CXX object vpr/CMakeFiles/libvpr.dir/src/timing/timing_fail_error.cpp.o
[100%] Building CXX object vpr/CMakeFiles/libvpr.dir/src/timing/timing_util.cpp.o
[100%] Building CXX object vpr/CMakeFiles/libvpr.dir/src/util/hash.cpp.o
[100%] Building CXX object vpr/CMakeFiles/libvpr.dir/src/timing/timing_graph_builder.cpp.o
[100%] Building CXX object vpr/CMakeFiles/libvpr.dir/src/util/vpr_utils.cpp.o
[100%] Linking CXX static library libvpr.a
[100%] Built target libvpr
[100%] Building CXX object vpr/CMakeFiles/vpr.dir/src/main.cpp.o
[100%] Linking CXX executable vpr
lto-wrapper: warning: using serial compilation of 13 LTRANS jobs
[100%] Built target vpr
(VPR) root@0be0dbd108b5:~/VLSI-FPGA#
|
运行以下代码以检查VPR模块是否正确编译:
1
| ./build/vpr/vpr arch/stratix10_arch.timing.xml benchmark/flattened_timer.blif
|
观察到以下结果说明程序没有问题:
1
2
3
4
5
6
7
8
9
| Incr Slack updates 1 in 0.000465027 sec
Full Max Req/Worst Slack updates 1 in 0.000197811 sec
Incr Max Req/Worst Slack updates 0 in 0 sec
Incr Criticality updates 0 in 0 sec
Full Criticality updates 1 in 0.00104656 sec
Flow timing analysis took 3.20806 seconds (2.6542 STA, 0.553867 slack) (201 full updates: 26 setup, 0 hold, 175 combined).
VPR succeeded
The entire flow of VPR took 62.63 seconds (max_rss 362.6 MiB)
(base) root@96dd2831fa21:/vpr_master/test#
|
同时会在当前目录下生成大约11个文件,代表当前代码应用到具体芯片上的设计结果,其中:
1
2
3
4
5
6
7
8
9
10
11
12
13
| (base) root@96dd2831fa21:/vpr_master/test# tree
.
|-- flattened_timer.net
|-- flattened_timer.net.post_routing
|-- flattened_timer.place
|-- flattened_timer.route
|-- packing_pin_util.rpt
|-- pre_pack.report_timing.setup.rpt
|-- report_timing.hold.rpt
|-- report_timing.setup.rpt
|-- report_unconstrained_timing.hold.rpt
|-- report_unconstrained_timing.setup.rpt
|-- vpr_stdout.log
|
开发环境
注意,整个项目源文件非常大,导致GDB加载符号表的时间很长(大约1分钟时间才能进入调试,在自己机器上可能会更久)。
因此一定要养成良好的编程习惯,不要写一点函数就执行整个项目的调试,利用自行编写的单元测试函数实现函数正确性的验证。
Vscode配置
本教程基于vscode搭建调试环境,同学们可以自行尝试用Visual stdio或CLion等常规IDE,或者Trae这种AI高度融合的IDE。
推荐同学们安装一个Ai加持的IDE。在VScode中,推荐安装一个marscode插件,然后按照插件教程部署写代码的Ai。

在Vscode中使用F5的Debug功能,我们需要创建两个配置文件告诉Vscode如何执行项目的Debug工作。
- 创建一个文件夹
.vscode和两个文件launch.json和task.json。
launch.json填写以下内容:
1
2
3
4
5
6
7
8
9
10
11
12
13
14
15
16
17
18
19
20
21
22
23
24
25
26
27
28
29
30
31
32
33
34
| {
"version": "0.2.0",
"configurations": [
{
"name": "g++ - Build and debug active file",
"type": "cppdbg",
"request": "launch",
"program": "${cwd}/build/vpr/vpr",
"args": [
"${cwd}/arch/stratix10_arch.timing.xml",
"${cwd}/benchmark/flattened_pulse_width_led.blif",
"-j",
"8"
],
"stopAtEntry": false,
"cwd": "${fileDirname}",
"environment": [],
"externalConsole": false,
"MIMode": "gdb",
"setupCommands": [
{
"description": "Enable pretty-printing for gdb",
"text": "-enable-pretty-printing",
"ignoreFailures": true
}
],
"preLaunchTask": "build",
"miDebuggerPath": "/usr/bin/gdb"
}
]
}
|
tasks.json填写以下内容
1
2
3
4
5
6
7
8
9
10
11
12
13
14
15
16
17
18
19
20
21
22
23
24
25
26
27
28
29
30
31
32
33
34
35
| {
"version": "2.0.0",
"tasks": [
{
"label": "cmake",
"type": "shell",
"command": "cmake",
"args": [
"../"
],
"options": {
"cwd": "${cwd}/build"
}
},
{
"label": "make",
"type": "shell",
"command": "make",
"args": [
"-j",
"24",
"CMAKE_PARAMS=\"-DVTR_IPO_BUILD=off\"",
"vpr"
],
"options": {
"cwd": "${cwd}/build"
},
"dependsOn": ["cmake"]
},
{
"label": "build",
"dependsOn": ["cmake", "make"]
}
]
}
|
这个时候,回到主页,在这个位置打一个断点。然后按F5或者点击菜单Run下面的Starting Debugging。
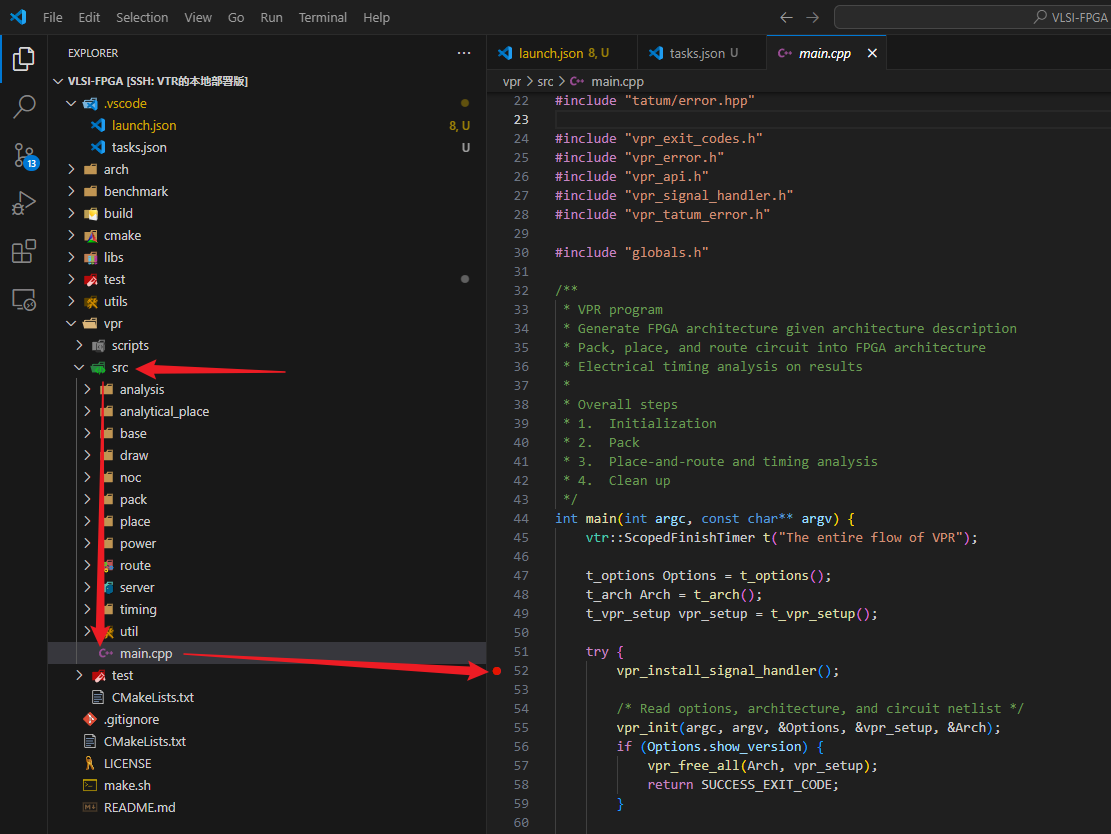
经过一番漫长的等待后,成功进入到熟悉的Vscode调试状态,Vscode停在了指定的位置。
调试提速
整个debug启动的过程十分漫长(作者在自己机器上启动要50s),十分浪费同学们的精力和耐心。
这主要是因为整个项目代码非常多,编译得到最后的vpr程序体积达到200MB,巨量的符号加载严重拖慢了整个gdb的调试进程。
VTR官方文档有提到建议安装RR-debuger用于二次开发。
⚠到这里就没有继续尝试,因为本人也一时半伙没有解决好RR-debug的安装。
- 另一种方法是使用
gdb-add-index来提前构造符号表。似乎没有用,加载时间还是一如既往的慢。
错误修复
std::range相关
VTR的源代码使用std::ranges,这是c++20标准引入的新内容,因此至少需要保证gcc>=10的环境。
解决方法:
- 尝试更新系统的编译器(不推荐)。
- 自行编译安装gcc和g++新版本,然后更新CmakeList.txt中关于编译器设置的部分。
- 换系统。不管是虚拟机还是Docker,这个方案都最省事也最快。